Have you ever wished the Transit Connect had a traditional dome light switch that allowed you to turn on all of the overhead lights from the driver’s seat? This is your project.
What you’ll need:
- Soldering iron
- Solder with flux
- 1 diode
- Panel tool for prying out front dome/map light assembly
- (optional) New bulbs
How it works
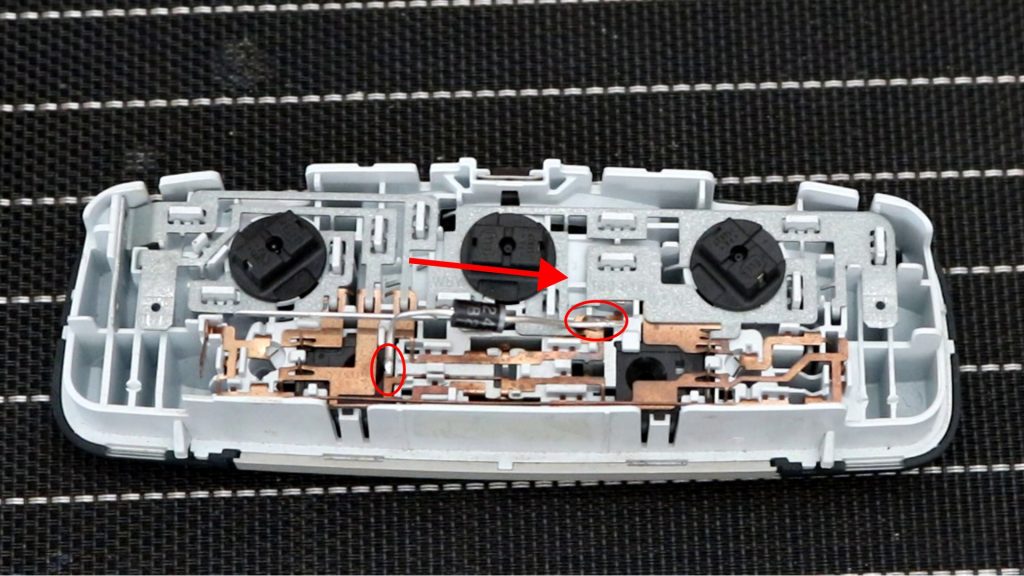
With the rear switches in the door position, the lights normally come on when the BCM dimmer relay grounds pin 1 (door position) of each of the switches. With the modification, when you switch the front switch to on, you create a ground path from pin 1 on each of the switches through the wiper (1B) on the front switch to pin 2, which goes to a permanently-connected ground. However, we need a diode not just a wire, otherwise the off position wouldn’t work (the front light would still come on with the BCM-controlled ground, even if the switch is off). We want current to be able to flow from pin 1 to the wiper (1B), but not from the wiper to pin 1.
Procedure
- Remove front light assembly. You’ll want a plastic trim tool to carefully pry the light assembly out of the overhead shelf without leaving marks on the plastic, starting with the side closest to the windshield. Once it’s loose, disconnect the two electrical connectors. The single-pin connector will require a fair amount of force to remove–make sure you’re pulling on the connector, not the wire.
- Clean any loose dirt off of the back side of the light housing to prepare for soldering.
- Solder diode as shown below. Note the orientation of the diode (i.e. the grey bar on one end), and bend the leads to land on the proper contact point without touching other circuits.
- Reconnect light and test operation. Consider replacing bulbs while it’s out, otherwise press back into place.